DocumentationGetting started
Quick start
Your first run, from choosing a provider to watching a team of agents finish its first job.
This page takes you from a fresh install to a team working on its first request. It follows the same steps as the in-app Guide, so you can keep the guide open next to you while you go. With the Demo provider the whole walkthrough takes a few minutes and needs no API key.
Complete the first-run screen
The first time you open Agentbits, a short setup screen appears with two steps: Provider and First project.
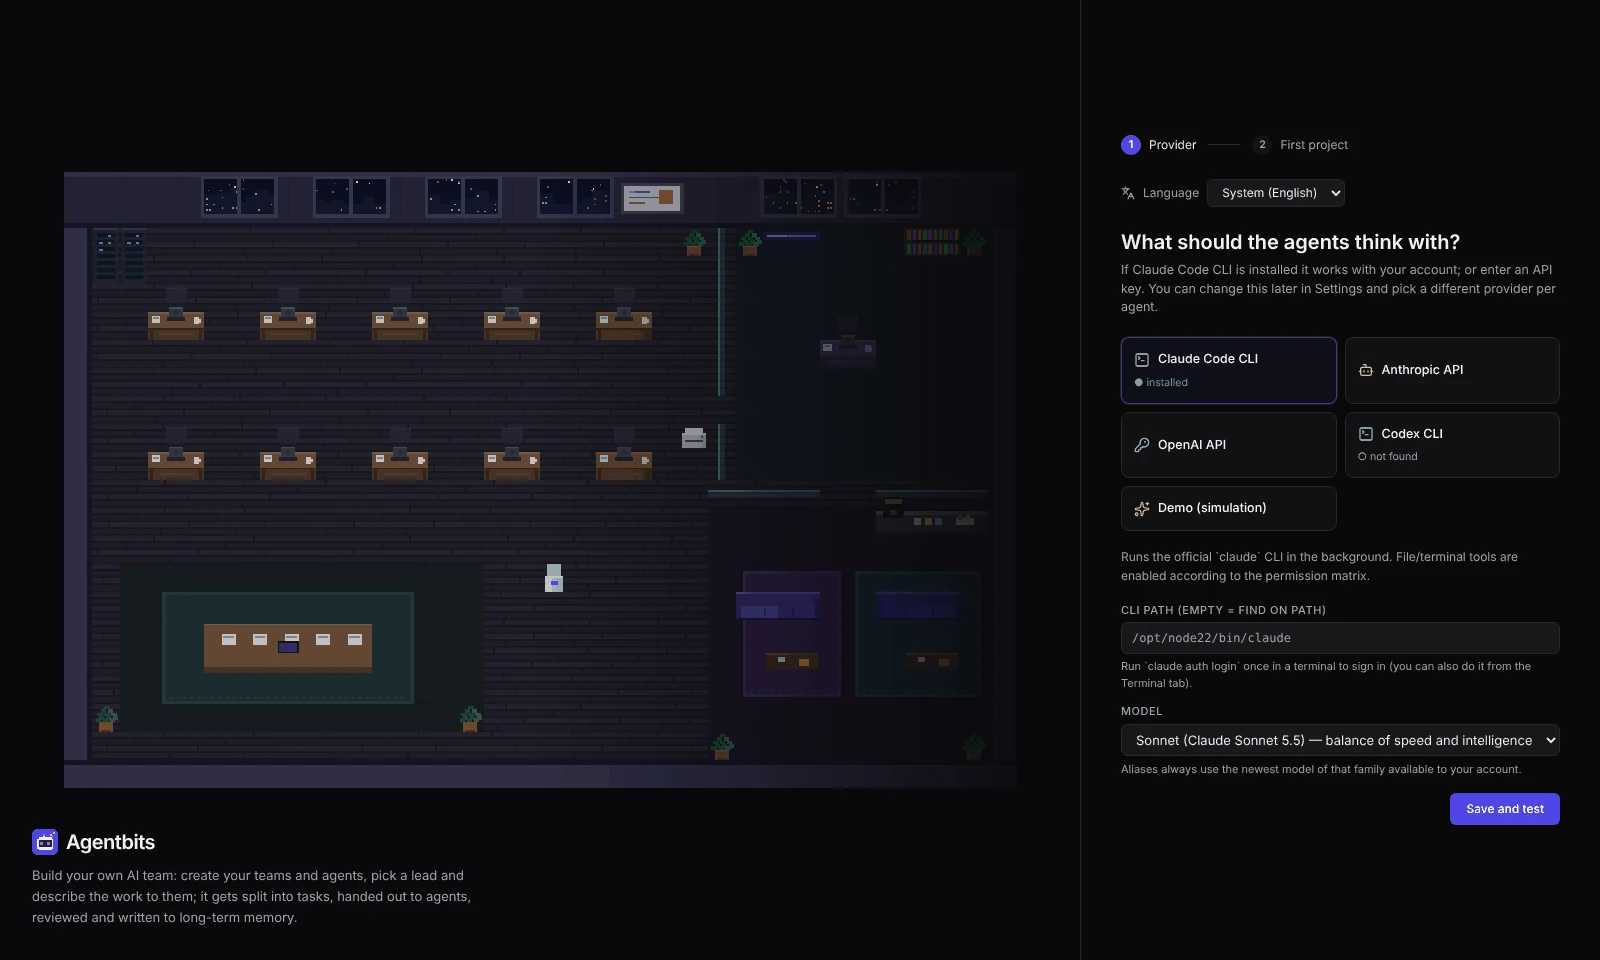
- Provider. Choose what the agents think with. Pick Demo (simulation) to explore without a key, or set up Claude Code CLI, Codex CLI, or an Anthropic or OpenAI API key. You can change this later in Settings → Providers and give each agent a different provider. See Providers.
- First project. Enter a Project name (if you leave it empty, it is called “First Project”) and choose a Folder. A folder is optional for Demo and API providers and required for CLI agents.
- Click Start. The project opens and the Guide appears.
Warning: CLI agents (Claude Code, Codex) really change files in the project folder. Start with an empty folder or a git branch. Agentbits refuses its own app folder as a project folder.
A fresh install has no agents, teams or tasks. You build the team yourself in the next steps.
Open the Guide
The Guide is a side panel with eight setup steps. Each step says why it matters and how to do it, and has buttons that take you to the right place. Steps tick themselves off as you go, and the top bar shows your progress. Open or close it any time with Guide in the top bar or F1.
The rest of this page follows those steps.
Build a team from a template
The quickest way to get a team is a template:
- Open Organization → Templates (Ctrl+O).
- Pick a template, for example Core Team (five agents). Others are Software Team, Research & Analysis, Product Development, Marketing & Content and E-commerce Company.
- Confirm with Set up from template. The units and agents are created with job descriptions, skills and permissions ready to go.
Everything from a template can be changed later in Organization → Agents and Organization → Teams. You can also build a team from scratch with Organization → Agents → New agent. The lead assigns work based on each agent’s role, skills and job description, so the clearer those are, the better.
Check the lead
The lead is the agent who talks to you in chat. It splits your request into tasks, assigns them and reviews finished work. Templates already set a team lead. To change it, choose the lead in Organization → Teams, or set a project-specific lead in the project settings. Without a lead the chat doesn’t work, though you can still create tasks yourself under Tasks.
Review permissions
Agents can touch real files, the terminal and servers, so you decide what each one may do. Open Settings → Permission Matrix to switch file read and write, terminal, network and Require approval on or off per agent. Access to servers and databases is separate, under Organization → Connections, and no agent has any by default.
Template agents start with Require approval on (except the Core Team lead, which doesn’t take tasks). That means each agent waits for your OK before it starts a task. It is a good way to see what is happening on your first run. See Permissions.
Give the project its team
A project is a folder plus the teams that work in it.
- Double-click the project tab in the top bar to open Project settings.
- Under Teams, select the team you just created. Selecting a unit also includes its sub-units.
- Leave Lead on Automatic (team lead), or pick a specific agent.
- Save the project settings.
You can also do this from the team’s side: in Organization → Teams, open the team and use Add to project…. For a new project, use + in the top bar or Ctrl+P → Open folder….
Give the lead its first job
Open Chat → #general and describe what you want, where and by when. For example:
Research three competitors’ pricing. Write the landing page copy. Prepare the campaign email.
You can attach files (PDF, Excel, Word, images and more) with the paperclip or by dragging them in. They are passed on to the tasks. The lead replies, splits the request into tasks and assigns them to team members.
Watch and steer
Now watch the team work:
- Running work in the left panel lists every running job with its progress. If an agent has Require approval on, an approval card appears here first. Approve it to let the agent start.
- Office shows the team at their desks, on coffee breaks, or with an approval or error badge. Click an agent for details.
- Tasks shows the board. Tasks move from To do to In progress, then to In review when the agent is done.
- Terminal → Agent terminals shows what each agent was asked, which tools it used and how many tokens it spent. From the box below you can Redirect the agent or Queue an instruction.
When an agent finishes, the lead reviews the work and either approves it (the task moves to Done) or sends it back with a revision note. Results end up in Reports, and accepted decisions in Decisions. To stop everything at once, click Pause all in the top bar.
Note: The Demo provider only simulates the work. Agents look busy and produce reports, but no real model is called and no files are changed. Switch to a real provider when you want real results.
What next
- Learn how the organization and projects fit together.
- Read how tasks move through autopilot, approval and review.
- Set up a real provider.
Found something wrong or missing? Open an issue on GitHub